Adding a Program
Brand Marketer
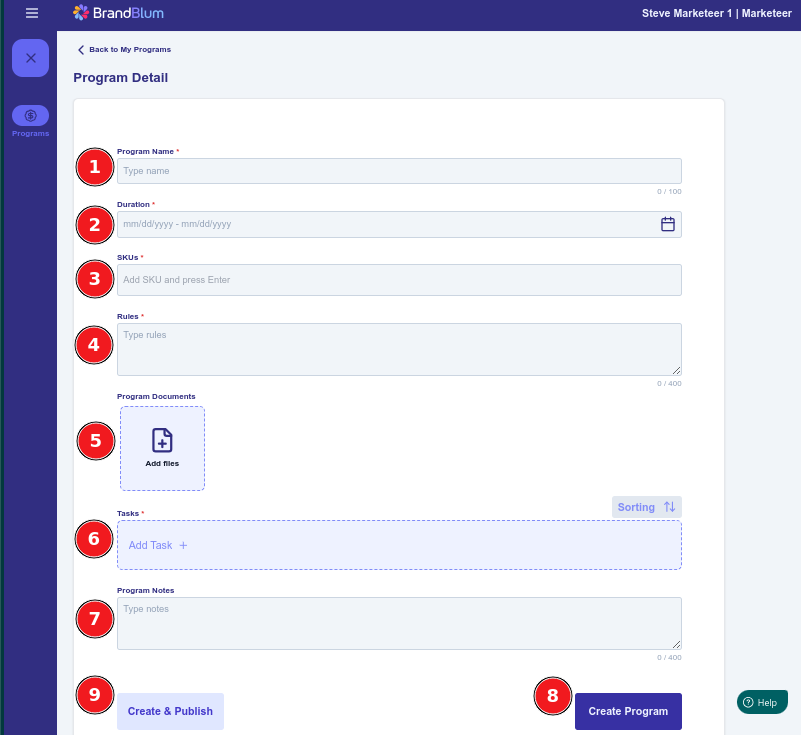
Once you click the "Add Program" button from the My Programs screen, you'll see the Program Detail screen.
Let's delve into each section that you'll need to create your program successfully:
1. Program Name (required)
Give your program a name. It can be anything you like, but keep it meaningful - retailers often participate in many promotional programs. An example of a Halloween-inspired program that discounts selected products by 13% might be "Spooky 13". Or you could give it a more descriptive name like "Halloween select 13% off MSRP".
2. Duration (required)
When you click on the Duration field, a calendar select tool will pop up. Select your program start and end dates in the calendar, then click the "Confirm Dates" button. Made a mistake? You can use the "Clear Dates" button in the calendar to clear the dates.
3. Program SKUs (required)
Enter the SKUs that are in the program. You can actually enter free-form text (up to 100 characters), so you can enter specific SKUs - as many of them as you'd like. Or maybe your program covers all SKUs, so you could just enter "All".....or maybe the program covers SKUs starting with 703 and 123, so you could enter "SKUs starting with 703" and then enter "SKUs started with 123". Or maybe the program includes all full-size items but not the junior or supersize items, so you could enter "All full-size items" as the SKU.
4. Program Rules (required)
In this field, you'll briefly describe the rules of your Program so the retailer understands the benefits and how it will work. For example, in your "Spooky 13" Program, the rules might be: "Your customers save 13% off MSRP, and we'll credit their savings to the next order you place with us after the program ends."
You can still include full Program terms and conditions as an attachment in the Program Documents section, which we'll get to next.
5. Program Documents (optional)
Here, you'll upload any documents, videos, or pictures relevant to your program. You can attach several items as long as each item is under 10 MB. This could be anything from program terms and conditions to product or promotional videos to a sales flyer to an FAQ document, a form, or even other education or promotional information. Keep in mind that the store will need to download the file to view the document, picture, or video.
To upload a Program Document, just click the "Add Files" button, locate the file(s) on your computer, and click the "Open" button in the pop-up. You can add multiple files by selecting them when you're locating them on your computer. You can also click the "Add Files" button again to add more files.
Made a mistake? If you want to delete a Program Document file, hover over the file with your mouse. You'll see a trashcan icon. Click the trashcan icon to delete the file.
Program Documents are optional - you're not required to upload anything.
6. Tasks (required)
Tasks are specific activities or actions that the Retailer must complete as part of their participation in your promotional campaign Program. These Tasks help ensure that the promotional activities are carried out effectively, according to the rules, guidelines, and terms that you've set.
You'll typically ask the Retailer to complete multiple Tasks for each Program. Example Tasks may include:
-
Upload a picture of your initial display with the sales collateral visible
-
Provide starting inventory count (total count for all program SKUs)
-
Provide ending count (total count for all program SKUs)
-
Upload a copy of each customer receipt for every customer that spends over $75 in the promo
To add a task, click "Add Task". You'll see the Add New Task dialog, shown below
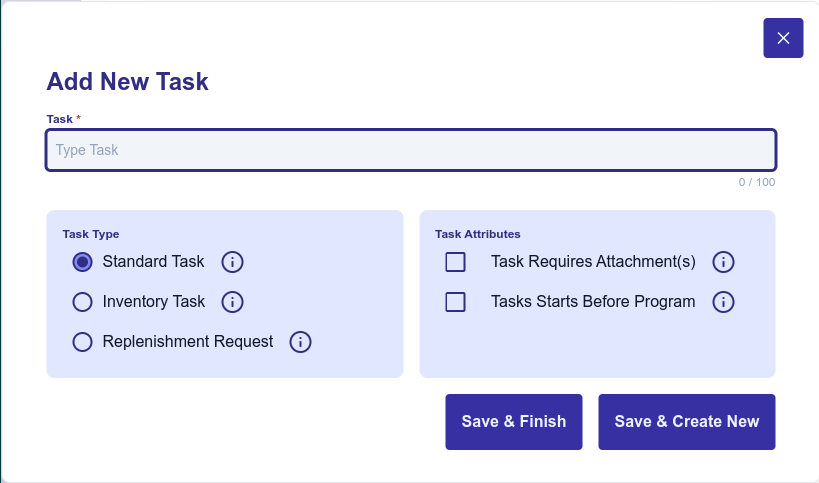
Type the Task (the action you want the retail store to take) in the task box, then pick the Task Type and the Task Attributes. Each Task Type and Task Attribute option is explained when you hover over the following symbol:
When you're finished with the task, click either:
- Save & Finish to save the task and go back to the Program Detail screen, OR
- Save & Create New to save the task and add a new task
To delete a Task, click the trashcan icon on the right of the Task to delete it.
To sort multiple Tasks, click Sorting (above the tasks), sort your tasks, and click Finish.
When the Retail Store completes and submits each Task, the Brand Salesperson will be able to review and approve or reject each Task submission.
7. Notes (not required)
Program Notes are optional short text, and can be used for any additional information you want to convey to the Retailer about the Program. It can include a reminder to review the FAQ in the Program Documents, or it could be other background on the Program. In our "Spooky 13" program, we might add the following note: "Our Spooky pre-Halloween promo is centered around the superstitious number 13. It may be unlucky for others, but you and your customers will luck out with a generous 13% MSRP Discount".
8. Create Program and 9. Create & Publish
When you're all done entering your program data. You'll want to save your program by clicking either:
- Create Program to save the program without publishing it, OR
- Create & Publish to save the program and publish it.
If any required information is missing or you've entered too many characters, the error message information will be shown in red. Update your information, then try saving your program again.
Once you've saved your program, you'll be taken back to the My Programs screen, where you'll see a quick summary of all the programs for your brand, organized by tabs.